
Step 1: Choosing a pattern. I haven't really followed a pattern before (I usually like to design my own) but I saw a quilt I thought my sis would like so I bought the book.
 Step 2: Choosing Fabrics to Match Marley's Bedding
Step 3: Designing the Layout for the Fabrics. (My favorite part)

Step 4: Cutting the fabrics and laying them out. This is the first time I used a "design wall," which is just a piece of batting pinned onto a curtain in my dining room. The fabric will stick to it without being pinned but would eventually fall off so I had to pin them in place.
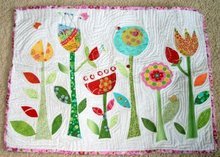
 Step 5: Applique-ing the stars. I had never done applique before and wasn't getting very good results doing it by hand so I ended up using a zigzag stitch on my machine. I used felt for the applique because I was afraid of using fabric and turning it under and using fusible web and all that but next time I will definitely use fabric. I don't know how the felt will wash, although the quilt is intended to be a wall hanging.
 Step 6: Piecing the quilt together. I did this all by machine.
Step 7: Basting. Clearly the most tedious part and I'm no good at it. I think I did a decent job. The finished result doesn;t really show any tucks, although there are a few hidden in there.

Step 8: Machine Quilting. This is the most challenging part, in my opinion. I never know where to start in terms of choosing a design or color thread. Since I was following a pattern I decided to just follow their suggestion. I machine-quilted "in the ditch" (meaning along every seam) with monofilament thread (clear thread that looks like thin fishing line). I've never used monofilament before and the result is... a quilt that is quilted but doesn't really look it. I've read that some people always quilt in the ditch with monofilament to stabilize a quilt before proceeding with decorative stitching.

Step 9: Hand Quilting. A new skill! I never hand quilted before and found it very fun and relaxing. Plus I could do it without all the mess and work of setting up my machine (it's in my living room right now but I try to keep it kind of hidden away and neat so my family doesn't complain. This means I have to pull the table out and do some set up before every quilting session and put it away after. It's not a big deal and doesn't take a lot of time but it's still a pain).
Anyway, I started out using a neutral colored thread (tan) and it didn't show up on the quilt, which is what I thought I wanted. I liked the way the quilt looked already so I didn't want to ruin it. The whole thing seemed kind of pointless though, since you really couldn't see it, so after a while I tried it with red thread and it's looked great! I took out all the hand quilting I had done (a decent amount) and re-did it in red. I used freezer paper (a new tool!) and cut the stars out and ironed them to the quilt. I quilted around them and then took the freezer paper away. Easy!

Steps 10-12: I won't show them because it gives too much away and I want some part of the quilt to be a surprise to my sister but...
Step 10: Quilting the border. I wasn't sure what if I was going to do it or not and I tried it and it looks great and gives the quilt a balanced and finished look.
Still to be done:
Step 11: Attaching a quilt sleeve. I've never done this before either but it seems pretty easy. The quilt will most likely go on a wall so it needs a sleeve.
Step 12: The binding. I found a fantastic fabric for the binding that completely matches the bedding my sister got for the baby. Unfortunately it's a home decor fabric so it's not as soft as the rest of the quilt but I think it will be fine. I have to cut it on a bias, sew the pieces together by machine, sew the binding to the front of the quilt by machine and then stitch it over to the back by hand.
I could definitely do steps 11-12 today but I really have to take care of some things in the house so... probably I won't get to it. As I said, the quilt isn't going to be given to my sis for a whole month but Talia is really excited about her princess quilt and I'd like to get started. I've chosen the fabrics, washed and ironed them, and figured out the quilt design. The next step is the actual quilt layout, which I mentioned upthread is my favorite part so I really want to get to it! I have a busy weekend and a busy two or three weeks coming up, with T's birthday and our house hunting trip to Madison but I'd love to get started on it. It should be really simple. If I had all the time in the world to work on it, I bet it would only take two or three days.


No comments:
Post a Comment